본 내용은 스윗한 SwiftUI 책에 있는 예제를 공부한 내용입니다.
해당 예제들에 대한 저작권은 BJpublic 에 있습니다.
- 이미지에 frame 속성을 사용해도 이미지 자체의 크기를 변경해 주진 않음
- Resizable 속성을 사용하여 이미지 크기를 변경할 수 있음
HStack {
	Image("imgFile")     // 이미지 크기는 변하지 않고, 이미지를 포함함 뷰의 크기가 변함
		.frame(width: 50, height: 50)

	Image("imgFile").resizable()    // resizable() 을 사용하여 이미지 크기 자체가 변함
		.frame(width: 200, height: 50)
}

- frame 은 View의 속성이기 때문에 resizable 과 순서가 중요함!
- resizable() 을 사용하여 특정 영역만 늘려주는 것도 가능함
- 단, UIKit 처럼 ResizingMode 를 생략하면 tile 이 아니라 stretch가 기본값이 됨
HStack {
            Image("swift")
            //capInset 매개 변수에 늘어날 영역 지정. resizingMode 생략 시 stretch 적용
                .resizable(capInsets: .init(top: 0, leading: 50, bottom: 0, trailing: 0))
                .frame(width: 150, height: 150)

            Image("swift")
                .resizable(resizingMode: .tile)
                .frame(width: 150, height: 150)
        }

ContentMode
| UIKIt | SwiftUI | 설명 |
| Scale to Fill | Default 값 | 종횡비와 상관없이 이미지를 늘려 표현 |
| Aspect Fit | .scaledToFit() | 종횡비를 유지한 채로 표현가능한 최대로 표현 |
| Aspect Fill | .scaledToFill() | 종횡비를 유지한 채로 표현하며, 이미지가 짤리거나 추가적으로 더 크게 표현 |
HStack(spacing: 30){
						// 기본값
            Image("swift").resizable().frame(width: 100, height: 150)

						// UIKit의 Aspect Fit 적용
            Image("swift").resizable()
                .scaledToFit()
                .frame(width: 100, height: 150)

						// UIKit의 Aspect Fill 적용
            Image("swift").resizable()
                .scaledToFill()
                .frame(width: 100, height: 150)
        }

AspectRatio
- 이미지 비율을 좀더 세부적으로 조정하기 위해 사용하는 수식어
- 모든 콘텐츠가 적용된 상황에서 추가적으로 비율조정을 하기위해 사용
// CGFloat : 너비 / 높이 를 계산한 비율을 전달
func aspectRatio(_ aspectRatio: CGFloat? = nil, contentMode: ContentMode) -> some View

// CGSize : 너비 와 높이를 각각 설정
func aspectRatio(_ aspectRatio: CGFloat? = nil, contentMode: ContentMode) -> some View
AspectRatio 적용한 예제
HStack(spacing: 30) {
            //scaledToFit 콘텐츠 모드를 적용한 뒤, 너비가 높이보다 1.6배 비율을 가지도록 조정
            Image("swift").resizable()
                .aspectRatio(CGSize(width: 1.6, height: 1), contentMode: .fit)
                .frame(width: 150, height: 150)

            // scaledToFill 콘텐츠 모드를 적용한뒤, 너비가 높이보다 0.7배의 비율을 가지도록 조정
            Image("swift").resizable()
                .aspectRatio(0.7, contentMode: .fill)
                .frame(width: 150, height: 150)
                .clipped()
        }

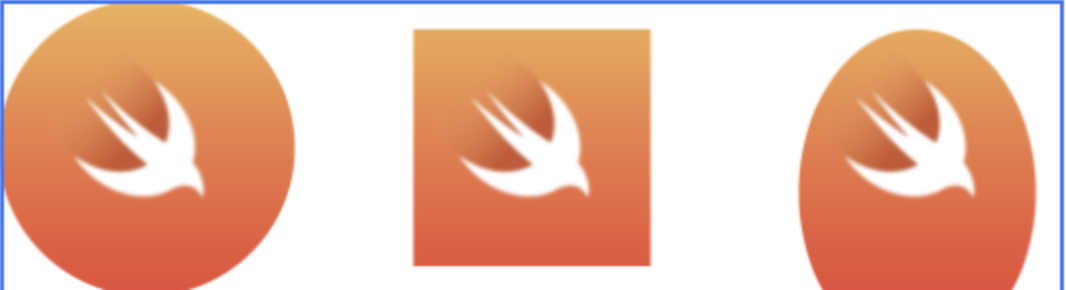
ClipShape
- 이미지를 원하는 모양으로 조정
- 크기 또한 조정 가능
HStack(spacing: 30) {
            // 원 모양
            Image("swift").clipShape(Circle())

            // 이미지 크기보다 사방으로 10씩 크기를 조정한 사각형
            Image("swift").clipShape(Rectangle().inset(by: 10))

            // 크기와 위치를 직접 지정한 타원
            Image("swift").clipShape(Ellipse().path(in: CGRect(x: 10, y: 10, width: 80, height: 110)))
        }
RanderingMode
- template : 이미지의 불투명 영역이 가진 본래의 색을 무시하고 원하는 색으로 변경
- original : 항상 이미지의 본래 색을 유지
- 렌더링 모드를 생략하면 시스템이 알아서 조정을 하므로, 원치않은 결과가 나오면 렌더링 모드를 지정해야함
HStack(spacing: 30) {
            // 렌더링 모드 생략 -> 시스템이 스스로 결정
            Image("swift")

            // 원본 이미지 색상 유지
            Image("swift").renderingMode(.original)

            // template 모드 적용
            Image("swift").renderingMode(.template)
        }
        .foregroundColor(.blue) // 자식 뷰 모두에게 일괄 적용

SF Symbol
- 애플에서 직접 만들고 제공하는 이미지들의 모음
- iOS 13이상부터 사용 가능
- 벡터 기반의 이미지로, 시스템 폰트로 크기를 조정 할 수도 있음
- 앱에서 심볼들을 확인 할 수 있으며, systemName: 으로 간단히 사용 가능
HStack(spacing: 30){
            Image(systemName: "star.circle")
            Image(systemName: "star.circle.fill")
        }

- ImageScale 을 적용하면 크기를 지정 할 수 있다. ( 기본값 → medium )
HStack(spacing: 30) {
            Image(systemName: "star.circle").imageScale(.small)
            Image(systemName: "star.circle")
            Image(systemName: "star.circle").imageScale(.large)
        }

- font 속성을 이용해서 크기를 조정 할 수도 있다
HStack(spacing: 30) {
            Image(systemName: "star.circle").font(.body)
            Image(systemName: "star.circle").font(.title)
            Image(systemName: "star.circle").font(.system(size: 40))
            Image(systemName: "star.circle").imageScale(.large).font(.system(size: 40))
        }

- weight 속성을 이용하면 굵기 표현도 가능 하다
HStack(spacing: 30) {
            Image(systemName: "star.circle").font(Font.title.weight(.black))
            Image(systemName: "star.circle").font(Font.title.weight(.semibold))
            Image(systemName: "star.circle").font(Font.title.weight(.light))
            Image(systemName: "star.circle").font(Font.title.weight(.ultraLight))
        }
